Import
The import process is compiled by 3 steps:
- File - where you select the file you wish to import.
- Settings - where you configure all the necessary settings.
- Import - where you verify if everything is good and start the import.
File
Here you will set the location of the CSV file that you want to import:
- Desktop - the CSV file is on your computer.
- URL - the CSV file is on the web and can be obtained by an URL.
- FTP - the CSV file is on your FTP server.
- Server - the file is on the same location as the CSV Import & Export application (on the current server).

After you uploaded the file or filled all the necessary information about the file location, click the NEXT button.
If all the information is good, the following screen will appear:

Here you will need to set your CSV file settings. By default, our system will automatically try to fill in the needed fields like delimiter, enclosure and encoding. You can also change this default behavior and set pre defined CSV settings in the Settings > Import tab > CSV settings.
Be sure to check if all the information is filled in correctly by you or our system. One sign that things might be wrong is if you find that the number of columns or records are strange. For instance: if the entered or detected settings are wrong, a warning message will be shown:

If all is correct, press the NEXT button.
Settings
In the second screen of the import process, you can see a couple of fields/elements. We have:
- Table - where you choose the table to import to.
- Mapping - where you will map the CSV columns with the DB fields.
- Filter - where you decide which rows you want to import.
- Duplicates / the rest - where you decide what to do with duplicate records.
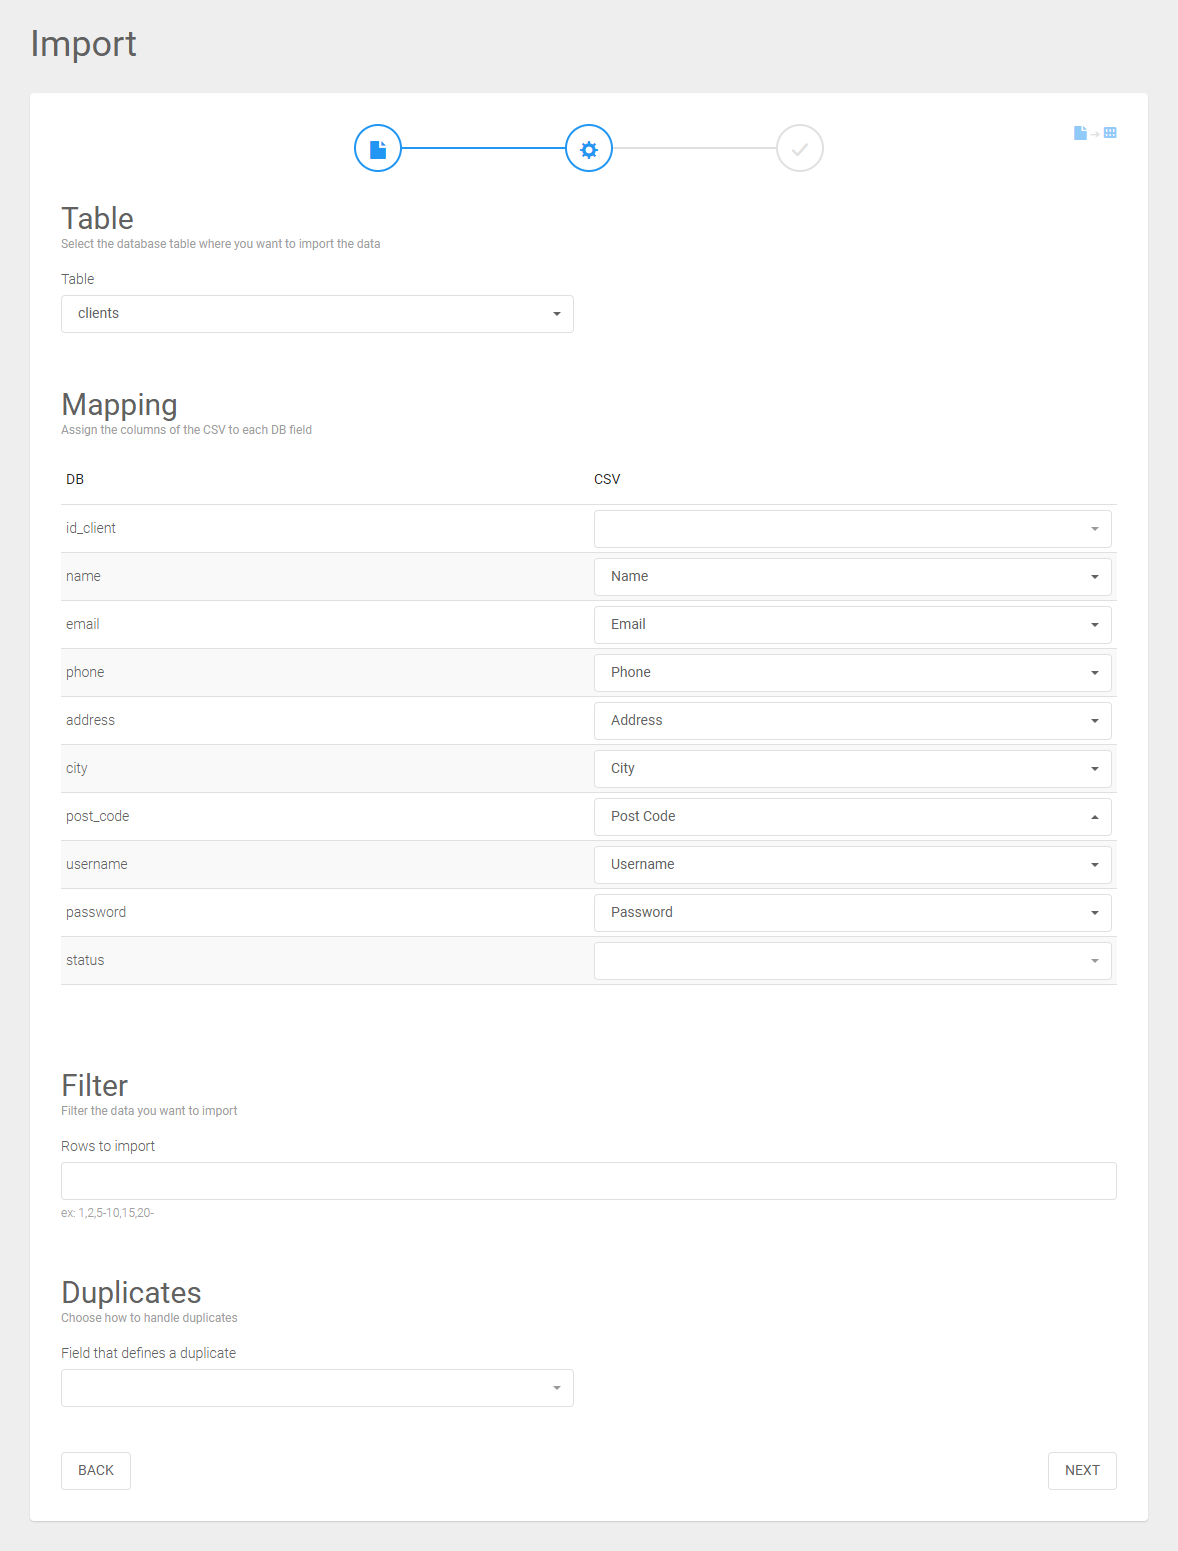
Table
After you have selected your file, you now have to choose in which table you want to import the information of the CSV file. In the example as shown in the screenshot, we have chosen the table “clients”. The selections that you have here, are the ones you have added earlier when you configured the databases and tables.
Mapping
Once you have selected the table you want to import, our system first automatically tries to match the columns of the CSV file with the columns of your desired table. In the example of our screenshot, you can see that our system successfully matched the columns “name”, “email”, “phone”, etc. There will be instances that our system will successfully match all columns for 100%, but it is likely you will have to match some columns manually. Even if our system has filled in all the fields for you, you still have to review it before you continue, just to be sure.
To match a column, click on one of the select boxes below the “CSV” header title, and choose the CSV columns that you want for the corresponding DB table field. After all is set correctly, you can continue to the filter field.
Filter
With the filter you can choose which specific rows you want to import. You can enter row for row that you want to import by using the “,” sign. For instance, if you only want to import row 1, 2 and 10, your input in this field is:
1,2,10
When you want to import row 1, 2 to 5, 10 to 20 and 30 till the last row, your input in this field is:
1,2-5,10-20,30-
As you can see, the “-“ symbol will let the system import until the last line is reached. When you leave the filter field completely empty, our system will import all the rows without consent.
Duplicates / the rest
In some cases, you will have rows in your .CSV file that already exist in your chosen table. Our system gives you multiple possibilities to handle these rows.
You can choose to:
- Just simple skip the row(s).
- Insert the duplicate row(s) as a new record.
- Update the current record in the database table.
- Delete the duplicate row(s).
Deleting rows is a great feature when you want to clean your database really fast, when there are a lot of faulty entries as an example.
You can also decide what you want to do with the rest of the rows of the CSV that are not on the database. You can select to:
- Create new records from data newly present in your .CSV file.
- Delete records that are no longer present in your .CSV file from the database
Import
In this final screen before you start importing, you can check all of your input and output one last time.
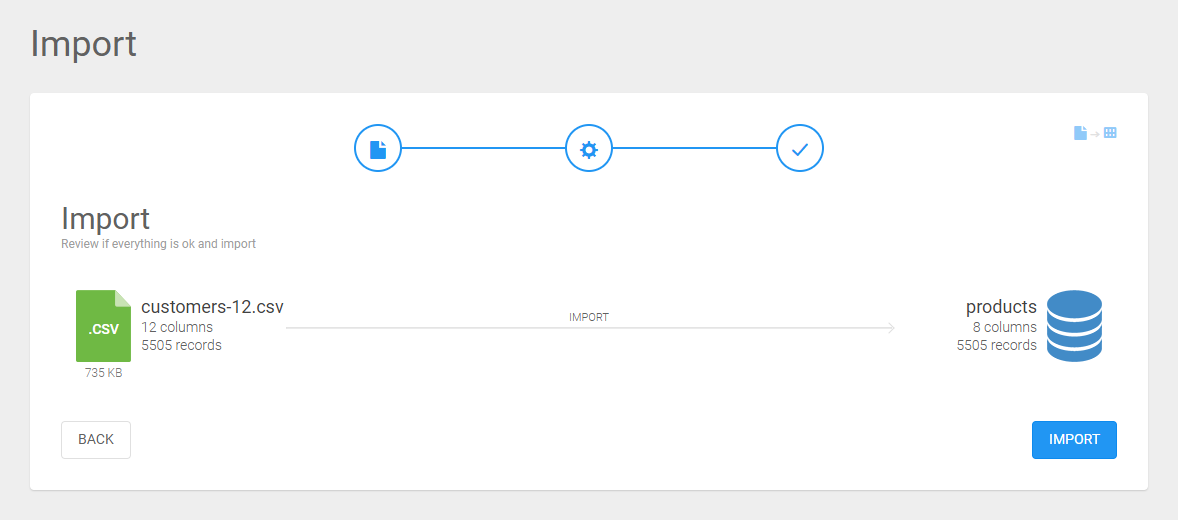
- On the left, next to the .CSV icon, you can see how much columns and records your file has. If this information seems strange or is not right, you can click on the icon to preview the actual import file. You can also press the back button to reconfigure your import.
- On the right, next to the database icon, you can see how much columns and records are going to be imported into the database table. If this information seems strange or is not right, you can click on the icon to preview the database table information. You can also press the back button to reconfigure your import.
- If all is correct, press the import button to start the import.
- After a couple of seconds (depending on the size of the import) you will see that the import has been completed. Below the .CSV icon, you can see how much time there has been elapsed, including the starting- and end date of the import. On the right below the database icon, you can see how many records are imported.
- To review everything in more detail, you can also press the VIEW LOG button to view everything.
- At any time of the import process you can preview the input and the output data if available, by clicking on the top right icons.